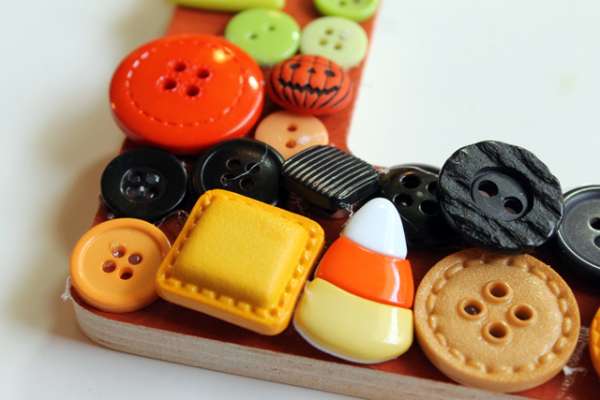
Creat a Easy Button Frame

What do you need this project:-
1) Different sized,shape and color buttons.
2) 4 x 6'' Wooden photo frame.
3) Oil Paint (whatever color you like).
4) Hot glue.
Instructions:
The first frame is painted,Then make sure the frame is completely dry.Now we will start the first step,First we'll put glue on the frame, then we'll make a one color button,
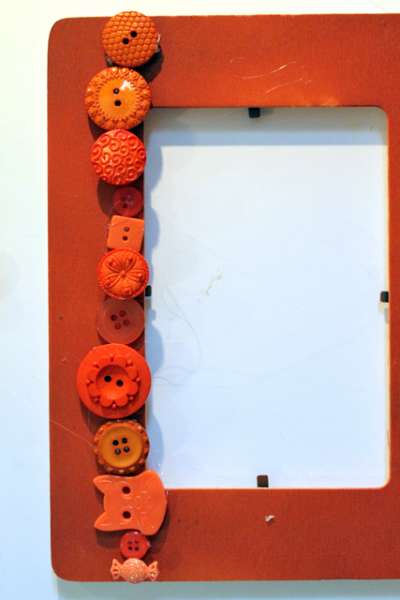
Again, we will apply the new color line button,
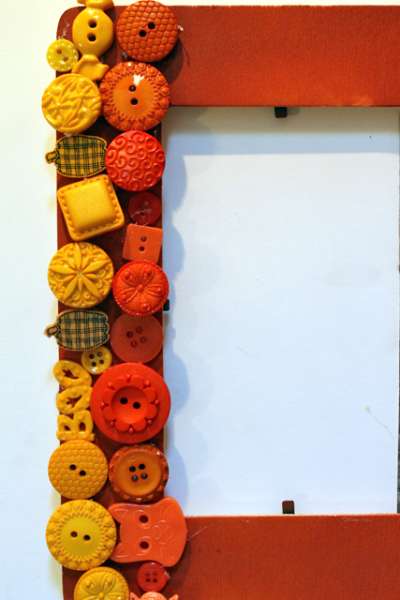
Continue creating stripes of buttons until you we covered the entire frame.
Now let it dry completely and now your frame is ready,You can gift it to your friends.
Thanks for Reading

Plastic Canvas Robot Craft
How can you making this craft, see the pictures and follows instructions
Step 1

Step 2


Step 3

Step 4

Step 5

Step 6

Step 7


Thanks for Reading

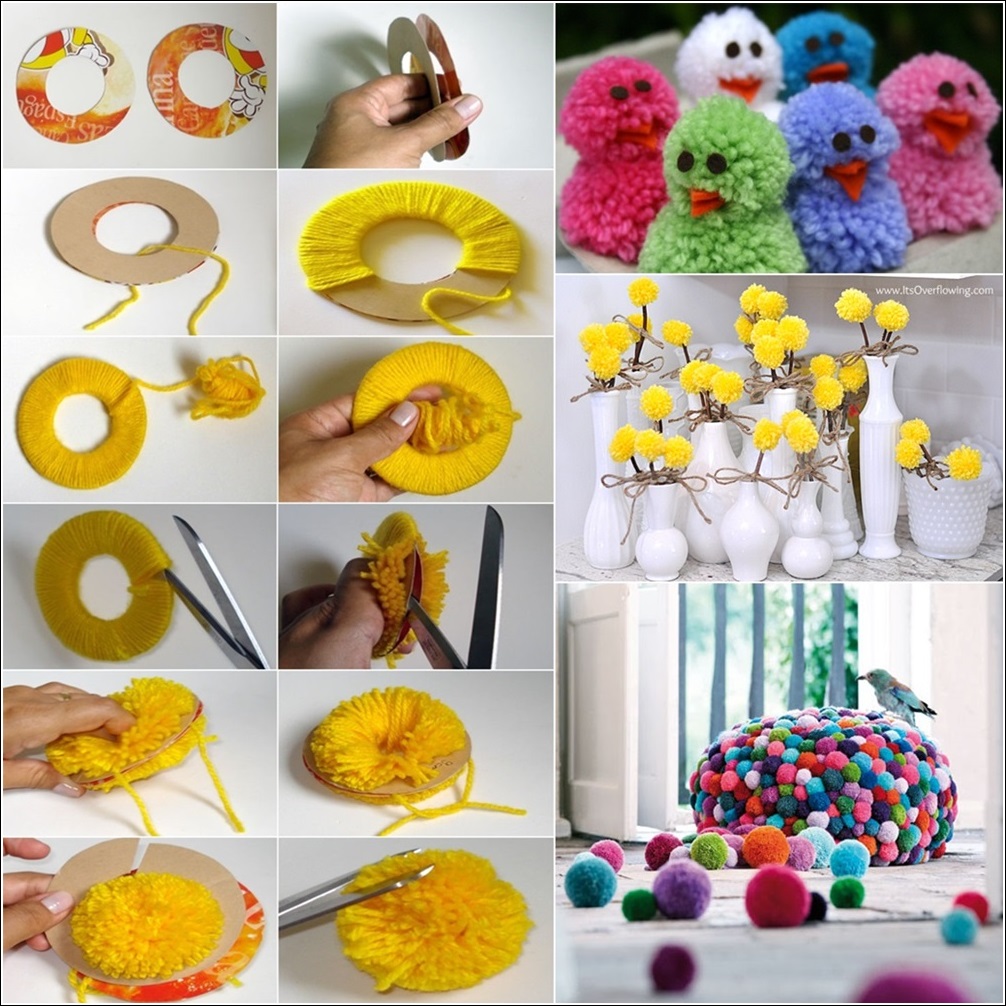
How to Make Pom Poms and Craft items from Them
Thanks for Reading

How to Make a Bottle Paint
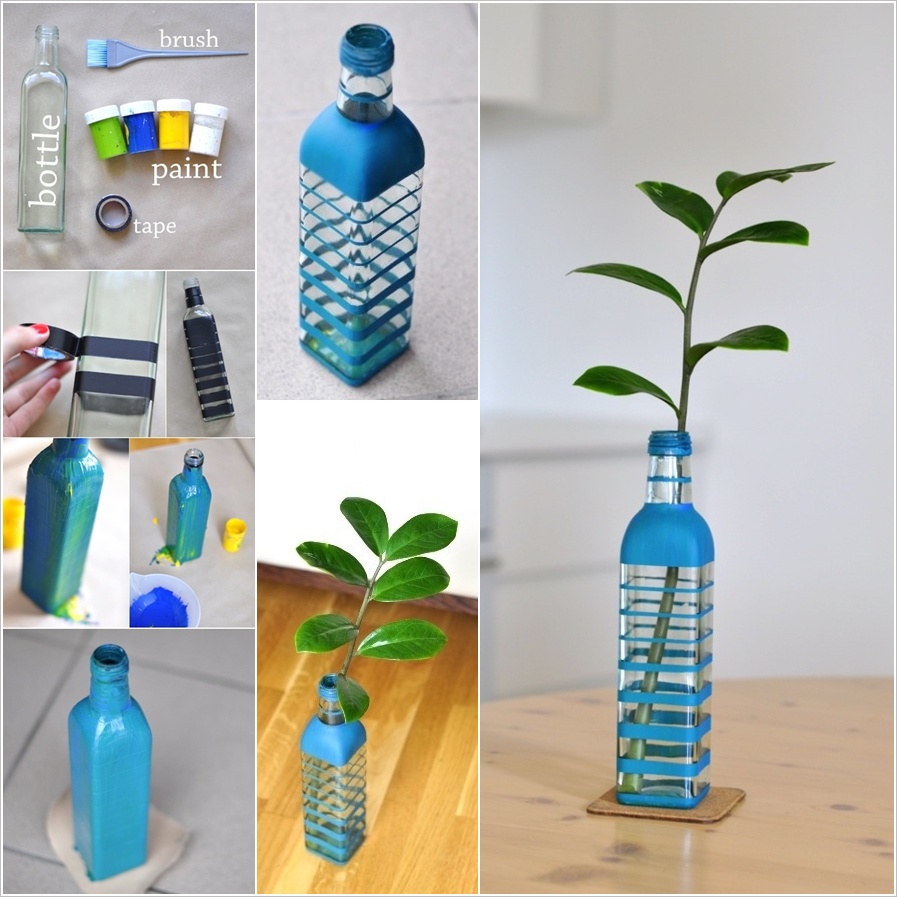
Start by coiling tape around the bottle , and cover the bottle with tape gradually decrease the distance between the strip of the tape.After that take some paint and covered tha bottle. Let the bottle dry completely so leave it over night . Then bottle is dry remove the tape and see the magical print it will create.
Thanks for Reading
The Sunflower Pillow

(Her pillow has 4 rows of petals and is 27 inches accross. You could do just 3 rows with a 21 inch diameter.)
Iron on fusible interfacing to one side of a large portion of fabric. You will be cutting your petals from this piece. Put another piece of fabric underneath it so that when you cut out your petals you have all the layers you need. Trace the petals onto the interfacing side.

You will need enough petals to go all the way around the pillow and the petals will be placed tightly next to each other. Place the petals wrong side togethr, invert them, and iron them flat.

Pin the petals in place and sew them on with a tight zigzag stitch.

As you move to the inner two circles the petals have one pleat so that they curve upward a bit like a real petal.


In the center you can put a button. Because her pillow is large she covered a plastic lid and inserted a little batting between the lid and the fabric. It is kind of like a giant covered button. She sewed it on with some decorative beads.

pin all the petals in to sew the pillow together. Place wrong sides together sew invert, stuff it with a lot of batting, and hand stitch the opening closed.

Thanks for Reading
Folded Petal Ribbon Flower

In making this flower you use the folded pieces of ribbon.

Take 3×1 inch piece of ribbon and fold it in such a way that both the cut sides are joined.

Now join all the five folded petals with a running stitch using a needle and thread.

Then pull the thread and secure the two ends with a knot.

Secure the petals with multiple stitches at the back of the flower and decorate it with pearls in the center. Enjoy!
Thanks for Reading
Make a Gift Bow from a Magazine page

In gift wrap emergencies when you've got the present but need some wrapping, here's an idea for turning a magazine page into a bow. There may be better ways to stick this thing together, but I used what I had on hand: staples and adhesive glue dots. Double stick tape or brads should work, too.

Cut a magazine page lengthwise into 9 strips, 3/4" wide. Leave 3 of the strips full length. Cut one inch off 3 of the strips. Cut two inches off 2 of the strips. Cut the last strip down to 3 1/2" long. If you're using a magazine that's 10 1/2" tall, you'll end up with: 3 strips, 10 1/2" x 3/4" 3 strips, 9 1/2" x 3/4" 2 strips, 8 1/2" x 3/4" 1 strip, 3 1/2" x 3/4" -

Twist each strip to form a loop at both ends and staple it in the center. Shape the last, short strip into a circle and secure it with a glue dot.

Layer the three longest pieces on top of each other, spacing them evenly and securing each with a glue dot. Add the next two groups of pieces, doing the same. And finally, stick the loop into the center.

Thanks for Reading

Make A Candle From Kitchen Supplies

This is such a simple and easy DIY project. Take a small glass jar. Hot glue a wick to the bottom of the jar. Pour vegetable or olive oil into jar while making sure to leave about 1/4"+ of the wick above oil. If you like add some essential oil fragrance to your candle and there you have it. You have made a very simple DIY candle made with supplies from the kitchen.


Thanks for Reading

Materials need in beaded ankle bracelet making:
Purple Baking Painted Glass Bead
Opaque 8/0 Glass Seed Bead
Cotton Wax Cord
Side Cutting Plier

How to make an ankle bracelet?
Step1: Make the pattern for your beaded ankle bracelet
Part1, cut out a 100cm long Korea Cotton Wax Cord and then fold it twice.
Part2, tie a knot at the top position, leave about 1cm long space.
Part3, fix the knot firmly to the desk with a clamp. Pay attention that the strand at center part can be little shorter that the other two.
Part4, braid the three branches.
Part5, stop to add on the beads when the braided part reaches about 2cm. To finish this process, adds one Purple Baking Painted Glass Bead on the center cord (here, you can use a section of tiger tail to help guide the double Korea Cotton Wax Cord pass across the Purple Baking Painted Glass Bead), then the other two cord respectively add 3~4 pieces of Opaque 8/0 Glass Seed Bead.

Part6, after finished the above action, tighten the cord and then repeat the processes from part 1~part 5 until you get ideal ankle bracelet length.
Step2: Ending work of ankle bracelet making project
After the beaded ankle bracelet reaches your ideal length, you can firstly continue to braid the rest cord for an extra 2cm long part and then tie a knot at the end. Then string one Purple Baking Painted Glass Bead with all three cord branches; next, each cord attach insert another one Purple Baking Painted Glass Bead.
Then, this beaded ankle bracelet is done!

enjoy yourself and have fun!
Thanks for Reading
Diy Tissue Flowers With Colored Tips

Supplies:
Tissue - 1 used 3 play for extra fluffy flowers
Bobby pins
Markers
Scissors
Floral tape
Store fake flowers if you want to make a bouquet

First, layer 2-4 tissues on top of each other. I used 3 per flower because I had three ply. Then fold them accordion style, push a bobby pin over the center. Next pinch of the ends. I left about 2 inches on each side, but you can make any size you want. Then take a marker and color the ends.

Now starting at the top, pull each layer of the tissue apart until it is at the center. Be careful not to tear the tissue. Work your way down the side until you reach the bottom, and then repeat on the other side. Then fluff.

Then repeat…a bunch of times. This is where the hours of busy time come into play and to attach them to the stems of store flowers .

Just pop off the flowers to expose the tops.

Now just pinch the bobby pins together and wrap a couple times with the floral tape, then continue to wrap the tape around to the bare stems, joining the bobby pin to the stem. That’s it!

Aren’t they pretty? You can even spray a little perfume on them if you want to get real fancy.
So now you have the perfect gift for your kiddos to make (or help make) for all those times you want something extra special. Or all the times you want them out of your hair…whichever fits the moment.
Thanks for Reading
Making A Jeweller Stand Using Plaster Of Paris

Thanks for Reading
Unique Easter Egg Decorations

Materials
- 6 papier mache eggs
- 3 feet of ribbon
- 6 bunches of silk hydrangea flowers (2 bunches per color)
- hot glue/glue gun
- scissors

Instructions:
1) Heat up your glue gun and snip all of the blossoms off the stems.

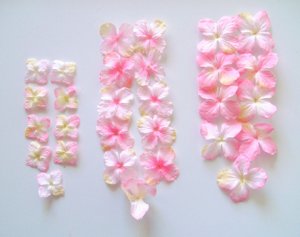
2) Separate the blossoms by color.
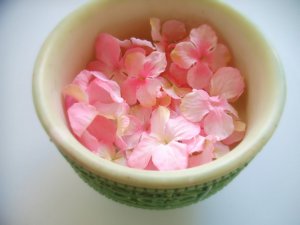 |
3) Separate the blossoms by size.
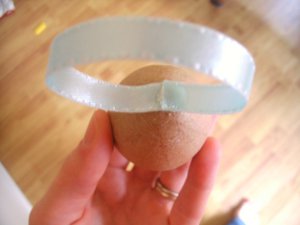
4) Cut 6 pieces of ribbon about 6" long each. Put a dab of hot glue on the top of an egg. Gently press one end of the ribbon in the glue. Loop the ribbon around and glue it to the secured end. Now you have a pretty little loop to hang your eggs.
5) Begin gluing the blooms on. Start with the large blooms. You might have to put a dab of glue in the center of the flower first, stick it on, and then add some glue to the petals. They don't have to lay flat. In fact it's better if they don't. However, you don't want them sticking out in every direction either.
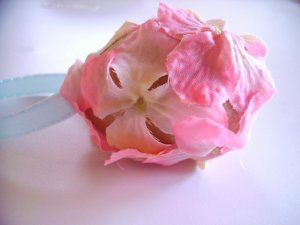
6) Once you have a nice coverage from the large blooms, begin filling in the spaces with the medium- and small-sized blooms. Keep gluing until you can't see any of the original egg.

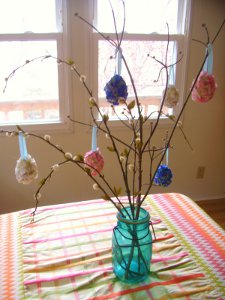
7) Then you're finished! Hang in a lovely spot or on some branches in a vase.
Thanks for Reading


No comments:
Post a Comment